Thursday, May 31, 2012

Cut up T Shirt

In case you haven't noticed, I love T shirts... I love to cut them up and make other things out of them.  They are one of my favorite mediums... I have piles of things I have made from them, and so many more ideas to go.  Sometimes these projects become something totally different, and sometimes, a T shirt is just that, a T shirt.  I have a very difficult time, leaving them as is... This brings me to today's post... Call it a tutorial if you'd like, what ever makes you feel better.

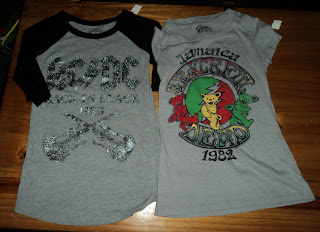
I had a great trip to a local thrift store the other day, and scored these two great shirts. The best part, I only spent $5.50 for both!  

They are a little tight on me, but I can fix that!  Today, I started on the black ACDC Shirt with the raglan sleeves. What a great idea I had for those sleeves!


I folded the sleeve flat. along the top, I cut slits about 1/s inch into the shirt, and about 1/2 inch apart. I started about 1/s inch from the neckline, and finished about that far from the hem.  I used my rotary cutter, but sharp scissors will work just as well.

This is what it looked like when I unfolded it.
Pull to stretch. the fabric will curl on itself... you want this.

Repeat on other sleeve.

You can stop there, or do more like I did.

Next I wanted to cut the back.  How you do this is a matter of personal taste and preference.  I don't like to wear a tank under my T's, and I don't like my bra to show, so I just cut at the top of the back.  You can cut all the way down, or as far as you'd like.  There are no rules!  Be creative!

I folded the T down the back, making sure the front was clear. Then I used a piece of paper as a guide and cut my slits  down the back. Once again, I used my rotary cutter, but sharp scissors work fine.  I spaced these about an inch apart. and got shorter as I went down the shirt. I put the shirt on, and measured from the neck to my bra so I knew where to stop.  


I also started about 3 inches down the back, to avoid the "tagless" label in this shirt. If you start too high, it will show when the fabric curls on itself.  I found that out the hard way... think black shirt - white stamped label... Ugh!

Pull to stretch, and you are finished! 

Here is what it looks like on.  It is not as tight, because it stretches more where I have cut it.  Might do more later, and get fancier. But this should be enough to get you started.


I would love to hear how this works for you!  Send me pics, and I will post them!  

Thanks so much for reading!
Happy crafting!
Crafty Claudia
KraftyKlaudia@gmail.com


Wednesday, May 30, 2012

A Challenge for Me... And You!

So, I haven't been very productive this week... but I have been creative! 

 I have been thinking about this bright pink T shirt that I got at Micheal's last week. I don't usually buy t's new, especially when I plan on cutting them up...But... They were on sale, and I needed PINK!  

I haven't gotten to the project it was intended for yet, but it has been washed, dried and preshrunk, and ready to go.  I know I will have plenty of shirt left, and already have a few other ideas to do with it. Some are projects I have already done, and some are brand new.

So, here is the challenge.  How many projects can be completed from just one T shirt?  

I will get to work on it this week, and post the results, with pics and tutorials next week.  I have a few ideas in mind, but would love to hear yours.  

Here is the T shirt in question. It is a bright pink Adult XL. Jerzees brand, heavyweight with no design or picture on the front


Any one else up for the challenge? I'd love to see your results! Feel free to share them!

Thanks for reading!
Crafty Claudia
kraftyklaudia@gmail.com
kraftyklaudia.blogspot.com


Friday, May 25, 2012

No Sew T-Shirt Beach Bag

This is a great project. It only took me about 10 minutes, and it is so easy!

I absolutely loved this shirt. Unfortunately, after it was washed a few times, it had started to twist... You know how they do sometimes, and I just couldn't bring myself to wear it that way. It has been sitting in my "to be crafted" pile for a while now, just waiting for that special project to come along.  This is it!

Here is what you'll need:

T-shirt
Scissors
Safety Pin

Ct the sleeves off the shirt and save them. Cut out the neckline in a low scoop. You have just made the handles. 


Cut around the sleeves making strips about 1/2 inch wide.  Stretch them. they will curl on themselves, making a string.  


Next, cut into the hem of the shirt, without cutting the stitching. You are going to thread the sleeve strings through the hem, and back out, like a drawstring. You can do this as many times as you'd like. One time will make a big hole on the bottom. The holes will get smaller as you increase the number.  I did 3.

With your safety pin, thread the sleeve strings through the hem, and out the next hole.  Pull tight and tie.  Do this until you go all the way around the hem.  You can cut them off, or leave them hang at the bottom of the bag.  I cut mine off. After thinking about it, I think it would be better to leave them hang, in case they come untied.  


Stretch the neckline, and where you cut off the sleeves, and you are finished.  Just pack your towels, sunscreen and sunglasses, and off to the beach you go!


This bag should work for groceries, too. Just don't put any tiny objects in, as they might fall through the holes in the bottom.


Have a great weekend!


Thanks for reading!
Crafty Claudia


Thursday, May 24, 2012

Thrifty Thursday - Homemade Stain Remover

Inspiration comes from all kinds of places... This one came from Facebook. A friend of mine was talking about making homemade laundry soap, and I thought I'd like to try it.  I was doing research on recipes, when I came across directions for homemade stain remover for the laundry... Since Shout pre-treat was on my list this week, I decided to try it.

This is the recipe I found.

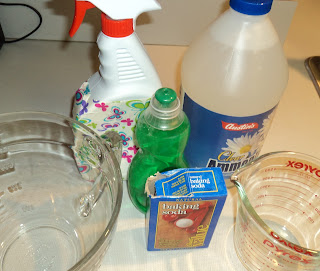
2/3 cup dishwashing liquid
2/3 cup ammonia
6 tblsp baking soda
2 cups warm water
A spray Bottle and 10 minutes ...


Mix everything together and pour into a spray bottle. I rinsed my empty bottle really well (my empty SHOUT bottle, nonetheless! Yes, I was being cost conscious.), including the sprayer, with warm water, and just reused it.


To use,  shake gently (GENTLY! Or, it may foam in the bottle.) and spray on stains. I like to rub mine in, and let it sit for a few minutes.


I can't wait to go to work this week, so I can try it out on those nasty food stains!


I had everything on hand, but wanted to give you a price breakdown. When I went to the store, I did price out Shout, and the items I used.


The bottle of real Shout... $2.68


The dish soap... Original  Palmolive...$1.08 for 18oz
Ammonia... $1.12 for 64 oz
I forgot to price the baking soda, but I think it was around $1 When I bought it. I used about half the box... That's my story, and I am sticking to it.


So, when I did the math, it came out to about 92 cents for this batch of stain treatment. I actually overflowed my spray bottle, and a small portion of it went down my kitchen sink, so it was probably cost less to fill the bottle.  That is a substantial savings over the "real thing"


I would like to mention a few safety tips that my hubby and son came up with... I would not recommend using dish soap with bleach, or using this formula in a load of laundry with bleach... Mixing ammonia with chlorine bleach can cause deadly gasses! Don't try it!


I would like to thank Jillee at One Good Thing, for posting this recipe. She seems to have had great results. I will let you know how it turns out for me!


Thanks so much for reading my blog!
Let me know if you found this useful.
Crafty Claudia
 

Tuesday, May 22, 2012

Tutorial Tuesday - Guitar Picks

OK, this is my first attempt at a tutorial... not sure about posting pics, but I will learn as I go! Hubby should be home soon, for technical support if needed! Great with the crafts, but I suck on the computer!


Who doesn't know someone who plays guitar? I know I know several people... These picks can be made from gift cards or credit cards, I have seen them made from yogurt cups, or one of my favorites, from those little bookmarks your kids get with their school pictures...What a great gift for Father's Day, a guitar pic with his child's picture on it!

For my tutorial, I used an Applebee's gift card, but you can use whatever you have on hand!

For this project you will need :

Gift Card, Credit Card or other stiff Plastic Item
Sharp Scissors
Marker
Guitar Pick
Emery Board, or fine Sandpaper
Alcohol
Paper Towels


Using your marker, trace the shape of the pick onto the Gift Card. Pay attention to the picture on the card, and make sure the best part is centered under your pick.  The pick I used was slightly transparent, making this part easy.
Using your sharp scissors, cut on the lines you just drew. Don't worry about the marker showing, we will take care of that later.
This is what it will look like when you are finished.
Next, use rubbing alcohol and a paper towel to remove the marker. This should also remove marker from your original pick that you used for your pattern.
Next use your emery board or fine sand paper to smooth the edges. The following pic was after the emery board, but I found the edges a little rough, and used the fine sandpaper after.
So, there you have it! Four guitar picks made from a gift card! This was a fairly thick gift card, and my son loves these! If you have someone who likes a softer pick, simply use a thinner piece of plastic.

Hope this gets you crafting! It is a simple easy starter project, and I had all supplies already on hand!

Thanks for reading my blog!
Crafty Claudia

P.S. I did it by myself. hubby isn't even home! Posting the pics was easier than I thought!